 Mastadon
 Feeds
Feeds Contribute
Twenty minutes of screensaver in 60 seconds
For those people who aren't running a recent version of MacOS and weren't able to install my Patrick O'Brian screensaver, this is a video I recorded of it (sped up to fit in 60 seconds):
Permalink - Comments - Tags: Development,Patrick O'Brian
Code sign and notarize your MacOS Screensaver to avoid Gatekeeper restrictions
The last time I built a screensaver was for the 2008 US Presidential election and back then all you had to do to distribute your binary was stick it on a web site and wait for people to download it. Doing this nowadays results, at best in platform warnings about running arbitary software downloaded from the Internet and at worst inability to run the software at all. Actually, I think this is probably pretty sensible but it meant I needed to jump through some hoops to get my MacOS Patrick O'Brian Mapping Project screensaver to run on other people's computers.
Some Googling led me to the 2019 WWDC announcement on the updates to how MacOS handles software distributed outside the app store. Unfortunately because of the way the MacOS screensaver process works, you can't distribute a native screensaver through the app store, so notarizing my app was the only way to go.
This post on the Apple developer forums actually describes the steps you need to follow, but I thought that a more explicit example might be helpful.
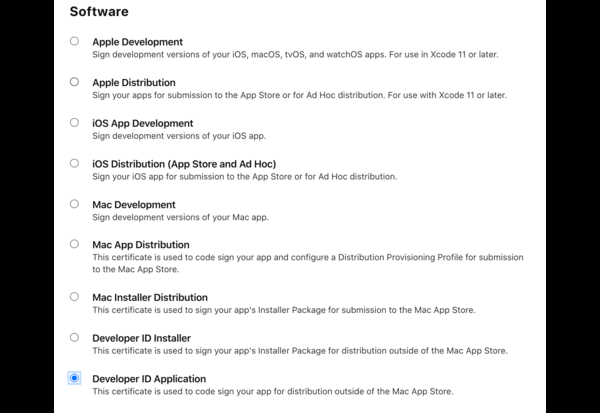
1. First thing you will need is a "Developer ID Application" certificate. That post I mentioned talks about using a "Developer ID Installer" certificate but that seems to be what you use if you are packaging your screensaver in an installer (which the OP isn't). Not sure if either way works, but I went with the "Developer ID Application" certificate to notarize my zip.
2. Once you have generated your cert (if you didn't already have it), downloaded and installed it in the KeyChain Access (by double clicking on it), you will need to codesign the screensaver binary ([your-screensaver].saver file). So something like this (the name is what will be listed in the names column in KeyChain Access once it is installed):
/usr/bin/codesign -f -o runtime --timestamp --sign "[Developer ID Application Name]" [your-screensaver].saver.
If your screen saver depends on external libraries, like SQLite for instance, you'll need to sign that as well. This post on the Apple forums explains that dependancies are signed inside out ("That is, if A depends on B, sign B before you sign A. When you sign A, the code signature encodes information about B, and changing B after the fact can break the seal on that code signature."). So for me, I needed to run codesign twice like this:
/usr/bin/codesign -f -o runtime --timestamp --sign "[Developer ID Application Name]" [your-screensaver].saver/Contents/Frameworks/SQLite.framework/Versions/A/SQLite
  /usr/bin/codesign -f -o runtime --timestamp --sign "[Developer ID Application Name]" [your-screensaver].saver
3. Now you have signed the .saver file, you can zip it up. So you'll now have a [your-screensaver].saver.zip file.
4. Now you need to notarize the zip file. For this you'll need an app specific password which you can generate on your Apple ID account page. Once you have that you can run the xcrun altool (N.B. xcrun lets you store and access passwords stored in the keychain if you need to put this in a script which you probably should do. Check out the help for --store-password-in-keychain-item for details on that).
/usr/bin/xcrun altool --verbose --notarize-app --primary-bundle-id "[Your application bundle ID]" -u "[Your Apple ID username]" -p "[The app specific password you generated]" -t osx -f [your-screensaver].saver.zip
5. If you are like me and your Apple ID is associated with multiple "provider accounts" (I am on several teams), you need to tell xcrun altool which provider you want to notarize with. So first you get the list of providers and then add the appropriate one to your notarize command:
/usr/bin/xcrun altool  --list-providers -u "[Your Apple ID username]" -p "[The app specific password you generated]"
  /usr/bin/xcrun altool --verbose --notarize-app --asc-provider [The ProviderShortname from the list of providers] --primary-bundle-id "[Your application bundle ID]" -u "[Your Apple ID username]" -p "[The app specific password you generated]" -t osx -f [your-screensaver].saver.zip
6. Ok. We are almost there (I promise). The notarization process takes a while as this tool talks to Apple servers about arcane stuff in your binary. You can check on it's progress with the following couple of commands (the first gets the history of notarization attempts and the second gives you the results for a particular RequestUUID):
xcrun altool --notarization-history 0 -u "[Your Apple ID username]" -p "[The app specific password you generated]" --asc-provider [The ProviderShortname from the list of providers]
  xcrun altool --notarization-info [The RequestUUID in the Notarization History list] -u "[Your Apple ID username]" -p "[The app specific password you generated]" --asc-provider [The ProviderShortname from the list of providers]
7. Hopefully if that all works you'll get an email telling you the notarization was successfull (or not). If there was an error you'll need to open the link (LogFileURL) in the notarization-info output to figure out why. For me my first attempt failed because I didn't realise I needed to codesign the SQLite dependancy.
8. Now you need to "staple" the notarization ticket to the screen saver application. Weirdly, even though you notarized the zip file, you can only staple to the application binary. To do this, you can just run this command:
xcrun stapler staple [your-screensaver].saver
This will generate some output like this (if all goes well):
Processing: /Users/.../[your-screensaver].saver
  The staple and validate action worked!
Now you can delete the old zip (yep, the one you originally notarized) and re-zip the freshly stapled [your-screensaver].saver then distribute your [your-screensaver].saver.zip to your heart's content.
Permalink - Comments - Tags: Development
Patrick O'Brian Mapping Project Screensaver
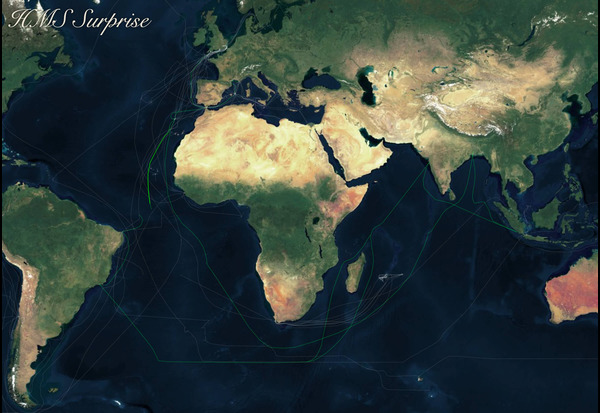
I have completed a 1.0 version of my Patrick O'Brian screensaver. This software should work (no guarantees) on MacOS 10.12 (Sierra) or later. To install, unzip and then double click Voyages.saver. You will be asked to install the screensaver for "this user" or "all users". Please see the terms of use below (N.B. Satellite imagery is provided by and copyright © MapTiler © OpenStreetMap contributors).
If you aren't interested in the implementation details and would like a copy, you can skip the rest of the post and download the screensaver here:
DownloadN.B. I am pretty sure I jumped through all the hoops I need to so that this screensaver can be installed without dire warnings, but please let me know if you aren't able to install it.
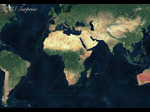
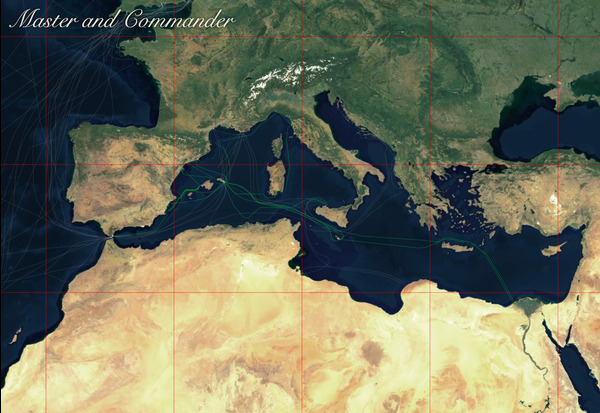
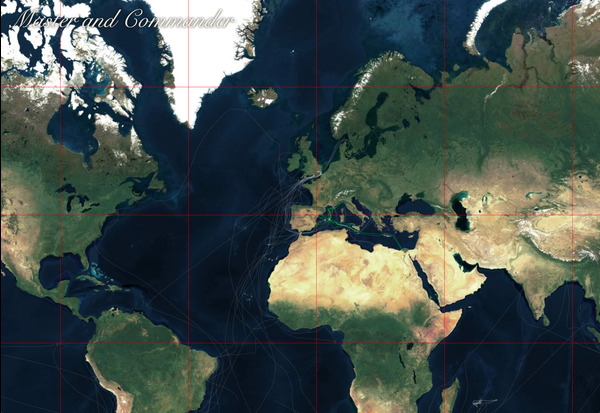
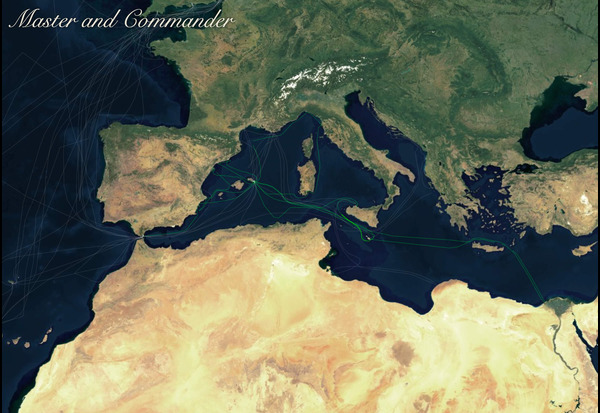
I wanted a full screen satellite map with the characters journeys (based on my latitude/longitude data) rendered on top. There are native libraries out there to do that kind of thing, but I thought it would be interesting to try and do some of this myself.
I started out hunting around for the Web Mercator Projection algorithm that GoogleMaps uses. There is a pretty good explanation of this in the Google Maps Javascript API docs. I do wonder though how that Javascript code translates to the projection formulas for x and y. I am missing something there.
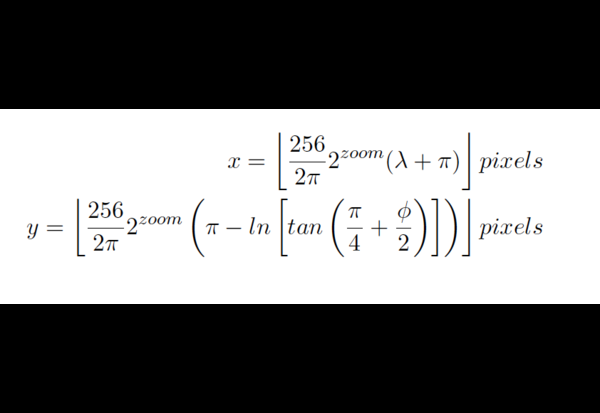
Someone had kindly ported that code to Swift so I was able to use that to get latitudes and longitudes successfully projected onto the screen:
Next step was to get hold of a satellite imagery tileset (obviously based on the Mercator Projection) that was free and easy to embed in my native app (no dependancy on an Internet connection for me). Fortunately OpenMapTiles had exactly what I needed. I didn't really need the full 186Gb dataset (although if I had a spare pile of cash lying around it would be fun to play with) so I grabbed the low res tileset.
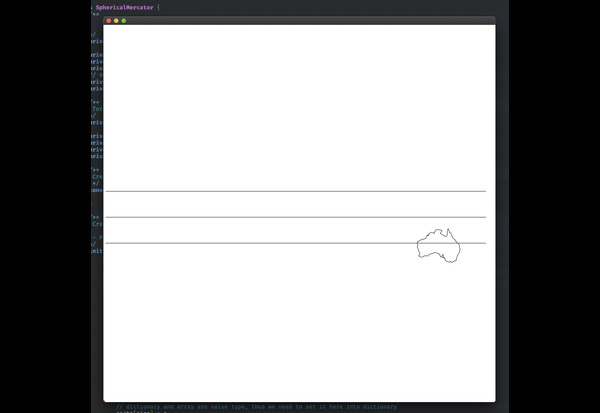
The download is basically just a SQLLite database file that you embed straight in your app. You can query a particular tile row,column and zoom level (the low res dataset has zoom levels 0-5) and extract the jpg data (the data format info is actually in the db so you can query that) into a byte buffer that you can pass stright into NSImage. Apart from some teething problems with the screensaver binary, this worked pretty well and I was able to get tiles rendering onscreen pretty quickly:
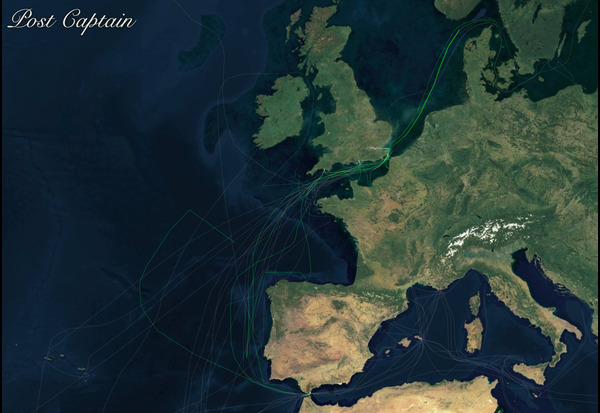
It's not particularly performant and I'm sure I could improve the animation by using GL or Metal directly, but I think it is good enough to warrant moving on to something new.
 Copyright (c) 2020
 Tom Horn.  All rights reserved.

 Redistribution and use in source and binary forms, with or without
 modification, are permitted provided that the following conditions
 are met:
 1. Redistributions of source code must retain the above copyright
	notice, this list of conditions and the following disclaimer.
 2. Redistributions in binary form must reproduce the above copyright
	notice, this list of conditions and the following disclaimer in the
	documentation and/or other materials provided with the distribution.
 3. Redistributions in any form must be accompanied by information on
	how to obtain complete source code for the DB software and any
	accompanying software that uses the DB software.  The source code
	must either be included in the distribution or be available for no
	more than the cost of distribution plus a nominal fee, and must be
	freely redistributable under reasonable conditions.  For an
	executable file, complete source code means the source code for all
	modules it contains.  It does not include source code for modules or
	files that typically accompany the major components of the operating
	system on which the executable file runs.

 THIS SOFTWARE IS PROVIDED BY TOM HORN ``AS IS'' AND ANY EXPRESS
 OR IMPLIED WARRANTIES, INCLUDING, BUT NOT LIMITED TO, THE IMPLIED
 WARRANTIES OF MERCHANTABILITY, FITNESS FOR A PARTICULAR PURPOSE, OR
 NON-INFRINGEMENT, ARE DISCLAIMED.  IN NO EVENT SHALL TOM HORN
 BE LIABLE FOR ANY DIRECT, INDIRECT, INCIDENTAL, SPECIAL, EXEMPLARY, OR
 CONSEQUENTIAL DAMAGES (INCLUDING, BUT NOT LIMITED TO, PROCUREMENT OF
 SUBSTITUTE GOODS OR SERVICES; LOSS OF USE, DATA, OR PROFITS; OR BUSINESS
 INTERRUPTION) HOWEVER CAUSED AND ON ANY THEORY OF LIABILITY, WHETHER IN
 CONTRACT, STRICT LIABILITY, OR TORT (INCLUDING NEGLIGENCE OR OTHERWISE)
 ARISING IN ANY WAY OUT OF THE USE OF THIS SOFTWARE, EVEN IF ADVISED OF
 THE POSSIBILITY OF SUCH DAMAGE.
Permalink - Comments - Tags: Development,Patrick O'Brian
Bundle.main.path forResource will return nil in a MacOS screen saver
I thought it might be worth writing a quick post on something that had me stuck building a screen saver for MacOS in Swift.
If you have a file you include in your build target (like a SQLite database of map tiles) and need to open that file you might try something like this:
let stringPath: String? = Bundle.main.path(forResource: "satellite-lowres-v1.2-z0-z5", ofType: "mbtiles")
Because I am debugging my application in a regular MacOS app (that just shows my ScreenSaverView) this code worked fine when I was debugging. As soon as I built and deployed the actual screen saver bundle everything broke.
So at that point you might spend quite a bit of time trying to debug entirely unrelated tile loading code before realising that bundle.main.path forResource was returning nil, but only in the screen saver application.
The reasons for this is that MacOS screen savers are bundles loaded by the system screen saver application, so the path you get will be something like:
/Applications/System Preferences.app/Contents/Resources
So to get this to work (in both the test app and the screen saver app) you need to get the bundle via a class in that bundle:
let stringPath: String? = Bundle(for: type(of: self)).path(forResource: "satellite-lowres-v1.2-z0-z5", ofType: "mbtiles")
I am just using the ScreenSaverView class which works fine.
This all took a little longer than it should have to find because, this being my first MacOS app, I wasn't sure where debug logging was ending up. Turns out it all appears in the Mac Console application ("Console" in Spotlight). I also struggled a bit because the Console app, or something in the MacOS logging framework was making decisions about the sensitivity of variables I was logging. So logging something like this:
os_log("Location was ---> %s", stringPath ?? "We got nil for our stringPath")
Ends up in the logs like this "Location was --->
os_log("Location was ---> %{public}s", stringPath ?? "We got nil for our stringPath")
Permalink - Comments - Tags: Development, Swift
Aggregate deeply nested JSONField data in Django
I ran across this problem the other day and it seems there aren't useful answers on this particular issue.
A combination of Django and Postgres makes it very easy to persist JSON data in your models. I think generally when building an application data schema storing JSON data is usually a bad idea. In fact this post and its partial solution is an example of issues you can have expecting JSON fields to behave predictably (in ORM terms).
In this case I wanted to store responses from a third party API and didn't think I would need to query data in those responses (hence no formal schema for the values within). Of course a requirement eventuated that required querying and then aggregation on values in the JSON I was storing and that is where I hit the problem described below.
(N.B. As I write this, with some hindsight, I think the correct solution is actually to migrate the values out of the JSON and store them in dedicated fields in the model, but anyway).
So if you want to filter by deeply nested values in a JSONField that part is fine. It actually works nicely with query_set syntax that matches doing joins across reverse relationships or foreign keys.
class ThingResponse(TimeStampedModel):
user = models.ForeignKey(User, on_delete=models.PROTECT, related_name="thing_responses")
    data = JSONField(_('The actual response from thing'))
If an example data looks like:
{
  "house": {
    "name": "Lannister",
    "seat": "Casterly Rock",
    "scion": "Tywin",
    "heir": "Jaime",
    "chapter_introduced": 5
  },
  "name" : "Tyrion Lannister",
  "age" : 24
}
and you want to find all the Lannisters, you could write a queryset like this:
ThingResponse.objects.filter(data__house__name="Lannister")
Things get tricky when you want to aggregate data in the JSONField. Aggregating on a value at the top level is fine (as described in this SO answer):
from django.db.models.functions import Cast
from django.db.models import Min, IntegerField
from django.contrib.postgres.fields.jsonb import KeyTextTransform

ThingResponse.objects.annotate(age_value=Cast(KeyTextTransform('age', 'data'), IntegerField())).aggregate(Min('age_value'))
You can annotate the queryset with nested values by nesting the KeyTextTransform like this:
ThingResponse.objects.annotate(chapter=Cast(KeyTextTransform('chapter_introduced', KeyTextTransform('house', 'data')), IntegerField()))
So this works fine and will annotate your result with a 'chapter' property with the nested value in it. Problem happens when you try and aggregate on that nested value:
ThingResponse.objects.annotate(chapter=Cast(KeyTextTransform('chapter_introduced', KeyTextTransform('house', 'data')), IntegerField())).aggregate(Min('chapter_introduced'))
You'll get an error like this:
File "[env path]/lib/python3.6/site-packages/django/db/models/sql/compiler.py", line 128, in get_group_by if (sql, tuple(params)) not in seen: TypeError: unhashable type: 'list'
I think what is happening here is the KeyTextTransform hasn't been resolved by this time so instead of a value it is getting a list of arguments.
So this is as far as I got with this and ended up implementing the aggregation in memory. If you do have a similar issue and find a solution to the issue with aggregating on nested JSON values I would love to hear from you.
Permalink - Comments - Tags: Development
[First Page] [Prev] Showing page 1 of 24 pages [Next] [Last Page]