 Mastadon
 Feeds
Feeds Contribute
Code sign and notarize your MacOS Screensaver to avoid Gatekeeper restrictions
The last time I built a screensaver was for the 2008 US Presidential election and back then all you had to do to distribute your binary was stick it on a web site and wait for people to download it. Doing this nowadays results, at best in platform warnings about running arbitary software downloaded from the Internet and at worst inability to run the software at all. Actually, I think this is probably pretty sensible but it meant I needed to jump through some hoops to get my MacOS Patrick O'Brian Mapping Project screensaver to run on other people's computers.
Some Googling led me to the 2019 WWDC announcement on the updates to how MacOS handles software distributed outside the app store. Unfortunately because of the way the MacOS screensaver process works, you can't distribute a native screensaver through the app store, so notarizing my app was the only way to go.
This post on the Apple developer forums actually describes the steps you need to follow, but I thought that a more explicit example might be helpful.
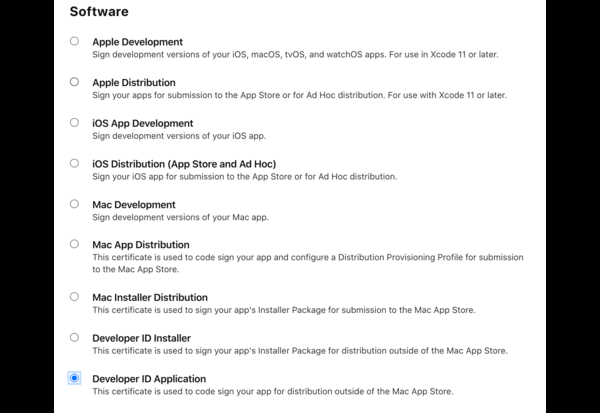
1. First thing you will need is a "Developer ID Application" certificate. That post I mentioned talks about using a "Developer ID Installer" certificate but that seems to be what you use if you are packaging your screensaver in an installer (which the OP isn't). Not sure if either way works, but I went with the "Developer ID Application" certificate to notarize my zip.
2. Once you have generated your cert (if you didn't already have it), downloaded and installed it in the KeyChain Access (by double clicking on it), you will need to codesign the screensaver binary ([your-screensaver].saver file). So something like this (the name is what will be listed in the names column in KeyChain Access once it is installed):
/usr/bin/codesign -f -o runtime --timestamp --sign "[Developer ID Application Name]" [your-screensaver].saver.
If your screen saver depends on external libraries, like SQLite for instance, you'll need to sign that as well. This post on the Apple forums explains that dependancies are signed inside out ("That is, if A depends on B, sign B before you sign A. When you sign A, the code signature encodes information about B, and changing B after the fact can break the seal on that code signature."). So for me, I needed to run codesign twice like this:
/usr/bin/codesign -f -o runtime --timestamp --sign "[Developer ID Application Name]" [your-screensaver].saver/Contents/Frameworks/SQLite.framework/Versions/A/SQLite
  /usr/bin/codesign -f -o runtime --timestamp --sign "[Developer ID Application Name]" [your-screensaver].saver
3. Now you have signed the .saver file, you can zip it up. So you'll now have a [your-screensaver].saver.zip file.
4. Now you need to notarize the zip file. For this you'll need an app specific password which you can generate on your Apple ID account page. Once you have that you can run the xcrun altool (N.B. xcrun lets you store and access passwords stored in the keychain if you need to put this in a script which you probably should do. Check out the help for --store-password-in-keychain-item for details on that).
/usr/bin/xcrun altool --verbose --notarize-app --primary-bundle-id "[Your application bundle ID]" -u "[Your Apple ID username]" -p "[The app specific password you generated]" -t osx -f [your-screensaver].saver.zip
5. If you are like me and your Apple ID is associated with multiple "provider accounts" (I am on several teams), you need to tell xcrun altool which provider you want to notarize with. So first you get the list of providers and then add the appropriate one to your notarize command:
/usr/bin/xcrun altool  --list-providers -u "[Your Apple ID username]" -p "[The app specific password you generated]"
  /usr/bin/xcrun altool --verbose --notarize-app --asc-provider [The ProviderShortname from the list of providers] --primary-bundle-id "[Your application bundle ID]" -u "[Your Apple ID username]" -p "[The app specific password you generated]" -t osx -f [your-screensaver].saver.zip
6. Ok. We are almost there (I promise). The notarization process takes a while as this tool talks to Apple servers about arcane stuff in your binary. You can check on it's progress with the following couple of commands (the first gets the history of notarization attempts and the second gives you the results for a particular RequestUUID):
xcrun altool --notarization-history 0 -u "[Your Apple ID username]" -p "[The app specific password you generated]" --asc-provider [The ProviderShortname from the list of providers]
  xcrun altool --notarization-info [The RequestUUID in the Notarization History list] -u "[Your Apple ID username]" -p "[The app specific password you generated]" --asc-provider [The ProviderShortname from the list of providers]
7. Hopefully if that all works you'll get an email telling you the notarization was successfull (or not). If there was an error you'll need to open the link (LogFileURL) in the notarization-info output to figure out why. For me my first attempt failed because I didn't realise I needed to codesign the SQLite dependancy.
8. Now you need to "staple" the notarization ticket to the screen saver application. Weirdly, even though you notarized the zip file, you can only staple to the application binary. To do this, you can just run this command:
xcrun stapler staple [your-screensaver].saver
This will generate some output like this (if all goes well):
Processing: /Users/.../[your-screensaver].saver
  The staple and validate action worked!
Now you can delete the old zip (yep, the one you originally notarized) and re-zip the freshly stapled [your-screensaver].saver then distribute your [your-screensaver].saver.zip to your heart's content.
Permalink - Tags: Development